What’s a machine if it can’t output anything useful. Building on that virtual machine I made a couple of weeks back, I put in support for virtual IO devices. By the way, everything is “virtual” here cause nothing’s physical. I hope that is how the terminology works.
Abstraction
Every IO module that will be plugged into the machine will be derived from an abstract IOModule class. So far, there is only one such module: A two-digit seven segment display.
To plug an IO module into the machine, the following steps are taken:
- Initialise the module (Initialisation)
- Attach the module to the virtual machine (Attachment)
- Module requests for a specific virtual memory location and required memory size (Allocation)
- At the end, the module is removed when its use is no longer needed. (Detachment)
All IO operations are done via the allocated virtual memory space. It’s a very naive approach, but for a simple machine like this one, it suffices.
Creating the abstraction for a virtual IO module was the simple part. The difficult bit is creating and running the window that will display the seven segment units. My first attempt was to create a window and run the message loop as soon as the attachment is done.
Because the message loop and the virtual machine ticks belong to the same thread, the machine stops responding when the window is displayed. The ‘endless’ message loop stops the machine from further execution. What I require is multi-threading.
Multi-Threading
As far as Win32 programming is concerned, creating new threads is a fairly easy process. The following code creates a new thread that increments a counter every second. In the main thread, a separate counter is incremented on every keypress (sort of, it’s a bit more complicated than that, but let’s skip the details). Both threads will write to the same console output.
#include <Windows.h>
#include <stdio.h>

// print a number that increments every second
static DWORD WINAPI threadFunc(LPVOID parameter) {
	int i = 0;
	int* signalToTerminate = (int*)parameter;

	do {
		printf("[Thread %d] i=%d\n", GetCurrentThreadId(), i++);
		Sleep(1000);
	} while (!(*signalToTerminate));

	printf("Thread %d terminating\n", GetCurrentThreadId());

	return 0;
}

int main() {
	printf("Press q to quit\n");

	int i = 0;
	int signalToTerminate = 0;
	HANDLE thr = CreateThread(0, 0, threadFunc, &signalToTerminate, 0, 0);

	while (getchar() != 'q') {
		printf("[Thread %d] i=%d\n", GetCurrentThreadId(), i++);
	}

	// signal the other thread to terminate
	signalToTerminate = 1;

	// wait for thread to safely finish
	WaitForSingleObject(thr, INFINITE);

	CloseHandle(thr);

	return 0;
}
The CreateThread function does what it says on the tin – it creates a new thread. The method returns immediately and the thread created starts running (unless the CREATE_SUSPENDED flag is set).
With multi-threading, both loops in the snippet above can run concurrently. There are, obviously, pros and cons to using multi-threading in your applications. However, most of the time, the pros outweigh the cons. The problem that comes with using more than one execution thread is the race condition. This is because, the order of execution of every thread involved is not well-defined. For my project though, this is not much of an issue.
Static Binding
If you have not noticed, the CreateThread function takes a function pointer as the starting instruction address for the newly created thread. This function needs to be statically-bound, i.e., for all intents and purposes, the function pointer can be resolved at compile time.
This presents another problem for the SimpleVM implementation, which is highly object-oriented, because, more often than not, dynamic binding is utilised. Naively, we may think the following snippet would work, but the compiler would throw a tantrum because the pointer-to-member-function is not allowed to be passed as a function pointer (they aren’t the same).
class AClass {
public:
	DWORD WINAPI threadedFunction(LPVOID param) {
		return 0;
	}
};

int main() {
	AClass* obj = new AClass;
	HANDLE thr = CreateThread(0, 0, obj->threadedFunction, 0, 0, 0);
	return 0;
}
To workaround this issue, we can mark the threadedFunction as static.
static DWORD WINAPI threadedFunction(LPVOID param);
Of course, this brings us to the next problem: A static function in a class cannot access the class’ member functions directly. Fortunately for us, the workaround for this is just as simple as the last one. Up till now, we have not used the parameter that comes with the threaded function. When we create a thread, we can basically pass a pointer to whatever object we can think of as a parameter to the threaded function.
#include <Windows.h>
#include <stdio.h>

class AClass {
public:
	int counter = 0;
	static DWORD WINAPI threadedFunction(LPVOID param) {
		AClass* obj = (AClass*)param;
		obj->increment();
		return 0;
	}

	void increment() {
		counter++;
	}
};

int main() {
	AClass* obj = new AClass;

	printf("Before Thread - counter=%d\n", obj->counter);

	HANDLE thr = CreateThread(0, 0, AClass::threadedFunction, obj, 0, 0);

	// wait until thread finishes
	WaitForSingleObject(thr, INFINITE);

	printf("Thread Finish - counter=%d\n", obj->counter);
	return 0;
}
By passing the instance reference as a parameter to the CreateThread function, the threadedFunction is able to use that parameter and access the members of that instance.
If you run the code, you should see the output showing the counter being incremented.
With that we have enough information to resolve the problem of the window message loop halting the main virtual machine execution.
Putting Everything Together
Here’s the declaration for the seven segment display.
namespace SimpleVM {
	class IOSevenSegment;

	typedef struct {
		HINSTANCE hInst;
		HWND window;
		HANDLE thread;
		IOSevenSegment* pObj;
		int createSignal;
		int stopSignal;
	} CreateWindowThreadData;

	class IOSevenSegment : public IOModule {
		CreateWindowThreadData threadData;

	public:
		static const VM_UINT32 BASE_OFFSET = 4096;
		static const VM_UINT32 MEM_LENGTH = 2;

		IOSevenSegment();
		virtual ~IOSevenSegment();

		virtual void attach(VirtualMachine* host) override;

	protected:
		virtual IOMemoryRequest getMemoryMapping();

		// window painting function
		void onPaint(HWND hwnd);

		// the WndProc function for the window
		static LRESULT CALLBACK wndProc(HWND hWnd, UINT msg, WPARAM wparam, LPARAM lparam);

		// the thread start function
		static DWORD WINAPI windowThread(LPVOID param);
	};
}
A few things to note here. The CreateWindowThreadData structure organises the data that will be passed as a parameter into the threaded function, windowThread.
This IO module will request to use 2 bytes from memory address 4096 (0x1000) from the virtual machine. A caveat: If the program spans longer than 4096 bytes, then care must be taken to ensure that these two bytes are untouched, possibly through the use of jump instruction.
For the same issue as the threaded function pointer, the wndProc function has to be statically-bound as well.
The way the module works is simple: It will keep redrawing the window, and on every redraw, it queries the two allocated bytes of memory. Each digit of the seven segment display is controlled by 1 byte. To turn on/off a single LED segment, the correct bit has to be set. The following shows the chart detailing the LED segments and their corresponding bit to be set.

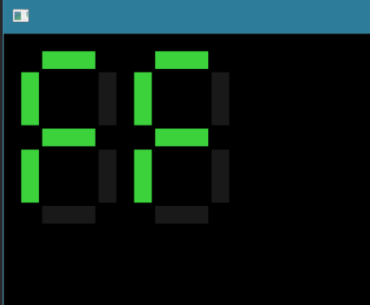
So with the following program, we load 0x3F79 (order is flipped due to endianness) as a 16-bit word into memory location 4096 to display the hex number “E0”.
int main(int argc, char** argv) {
	VirtualMachine mac;
	VM_UINT8 program[] = {
		0x01, 0,0x10,0,0, // LOAD 4096
		0x02, 0x10, // MOV R1,R0
		0x01, 0x79,0x3F,0,0, // LOAD
		0x84, 0x10, // MOVW [R1],R0
		0x90 // HALT
	};

	mac.loadProgram(program, sizeof(program));
	IOSevenSegment* seg = new IOSevenSegment();
	seg->attach(&mac);

	KeyClock clock;
	mac.run(&clock);

	delete seg; seg = NULL;
	return 0;
}
And here is the final result!

The code for the project can be found in my GitHub. In the next cycle, I plan to add an input module so I can actually interact with the machine.
